Nie masz w koszyku żadnych produktów
 
English Polski Spanish 
Szukaj instrukcji do
 

(e.g. AA-V20EG JVC, ZX-7 Sony )
PayPal 1000+ rating Secure, Encrypted Checkout.
 
Kto jest w sklepie?
Sklep przegląda 5878 gości 
Kategorie
Informacje
Polecamy
Strona główna >> KENWOOD >> VZ907 Instrukcja Obsługi
 
 0 szt. w koszyku 

KENWOOD VZ907
Instrukcja Obsługi


Tweetnij o tym produkcie a dostaniesz $1.00 rabatu!
  • Plik do pobrania
  • Format PDF
  • Kompletna instrukcja
  • Język: English, Japanese
Cena: $4.99

Opis KENWOOD VZ907 Instrukcja Obsługi

Kompletna instrukcja obsługi w formie pliku PDF. Plik PDF zostanie dostarczony na Twój adres email po jego zakupieniu.

Instrukcje obsługi (czasami nazywane także podręcznikiem użytkownika) opisuja funkcje i sposób działania danego produktu.

Instrukcja jest dostępna w następujących językach: English, Japanese

Plik nie jest jeszcze gotowy
Musisz najpierw dokonać zakupu.

Recenzje produktu
Dla tego produktu nie napisano jeszcze recenzji!

Tekstowy podgląd strony 39 (kliknij aby zobaczyć)
Installation for Antenna Unit
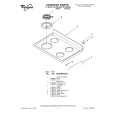
1. Mount the antenna main unit to the mounting bracket and check the locations where the antenna are to be fixed. Open the antenna and extended to full length. Adjust tilting and flip-up angles to confirm the actual use condition. 2. Remove the main unit from the mounting bracket. To remove, slide the release button to release the lock and lift the rear end of the main unit up as shown in the figure and slide the main unit forward.
Rear windshield

Fixing area

English

Rear defogger heater

Main unit (for left side) Mounting bracket

4. Remove the protective sheet from the double-sided tape on the mounting bracket and press firmly on to the rear windshield to fix. When fixing to the body etc, use supplied protective tape (Accessory@3)for protecting the body paint, if necessary.

Protective sheet of double-sided tape

Release button Mounting bracket

3. Clean off any grease or dirt from the fixing area for mounting bracket and cable holder, using supplied cleaning cloth(Accessory!8).
CAUTION

CAUTION

Warm up the rear windshield by rear defogger heater, if the surface temperature of the rear windshield is low. Fixing parts with the double-sided tape should be done indoor, on the day of high humidity such as on a rainy day even if the surface to be fixed is not wet. Low surface temperature and high humidity may not only weaken the adhesive strength of the double-sided tape, but also cause it to come loose.

Clean the window glass thoroughly, as failure to clean the glass can not only weaken the adhesive strength of the double-sided tape, but also cause it to come loose.

39

Klienci kupując ten produkt kupili także

$4.99

SX-K700 TECHNICS
Instrukcja Obsługi

Kompletna instrukcja obsługi w formie pliku PDF. Plik PDF zostanie dostarczony na Twój adres email…

$4.99

CJ-V51 PIONEER
Instrukcja Serwisowa

Kompletna instrukcja serwisowa w formie pliku PDF. Instrukcje serwisowe zazwyczaj zawierają schemat…

$4.99

GRAND PRIX ELECTRONIC 754 BECKER
Instrukcja Serwisowa

Kompletna instrukcja serwisowa w formie pliku PDF. Instrukcje serwisowe zazwyczaj zawierają schemat…

$4.99

SX-PR602 TECHNICS
Instrukcja Serwisowa

Kompletna instrukcja serwisowa w formie pliku PDF. Instrukcje serwisowe zazwyczaj zawierają schemat…

$4.99

EV-S1000E SONY
Instrukcja Obsługi

Kompletna instrukcja obsługi w formie pliku PDF. Plik PDF zostanie dostarczony na Twój adres email…

$4.99

GRAND PRIX ELECTRONIC 780 BECKER
Instrukcja Serwisowa

Kompletna instrukcja serwisowa w formie pliku PDF. Instrukcje serwisowe zazwyczaj zawierają schemat…

$4.99

AG7330 PANASONIC
Instrukcja Serwisowa

Kompletna instrukcja serwisowa w formie pliku PDF. Instrukcje serwisowe zazwyczaj zawierają schemat…

$4.99

EVO-9850 VOLUME 1 SONY
Instrukcja Serwisowa

Kompletna instrukcja serwisowa w formie pliku PDF. Instrukcje serwisowe zazwyczaj zawierają schemat…
>
Parse Time: 0.623 - Number of Queries: 125 - Query Time: 0.208